Build your own FaaS: Self-host Cloudflare workers and javascript functions on Fly and everywhere

A step by step guide to create and deploy a complete Function as a Service architecture you can host on your private resources
Introduction
Usually, when we run a serverless function in a FaaS provider — Cloudflare workers, AWS Lambda, Netlify functions, … — we expect everything’s working fine without worrying about anything.
But, sometimes we like to worry about. How does a FaaS work? Which are the elements involved? And what about running your functions in your own private space?
This article provides a step by step guide on how to build and self-host a complete FaaS architecture. There will be some code involved.
If you’re clueless on what this article is talking about, here’re some questions you can gloss over if you already know:
What is a Function?
In the context of cloud computing, a Function is a chunk of code that can be run by a server in isolation.
Usually, a function has:
- simple flow and logic — it doesn’t involve many interactions nor complex logic
- single responsibility — it does one thing only
- lightweight — doesn’t involve high computation or memory usage
Although functions are not strictly limited to web purposes, the common scenario for a function is to answer to web requests.
What is a FaaS?
A Function as a Service allows you to execute pieces of code, called functions, on demand without the burden of creating and managing a (micro)service. You provide just the code. The system will take care of the rest.
The system runs each function in isolation when something triggers a new execution. For example an external requests or a scheduled event.
The main benefit a FaaS brings is that it let you focus on the logic instead of the infrastructure. Just write and run code with no thinking about resources, scaling, monitoring and all surrounding things. Everything is managed in a homogenous way, across all functions. You learn one thing. Then, all is the same. Same development process, same deploy mechanism.
Why self-host a FaaS when there’re so many out there?
As this article focuses on the implementation part, we cannot reserve space for various reasons to adopt a self-host approach.
But, we can mention some legitimate reasons for you to embark on this journey:
you are a frontend developer and, tired of all that complexity that arises from arranging tags, you want distract yourself with a more lenient endeavor
you depart from your office early, and your job leaves you empty with plenty of time, which you’d like to fill with the endless entertainment backend systems provide
you have a weakness for simple things, you spent years to grow yourself in order to face challenges, but you can’t stop yourself to always pick the easy way out
This article describes a proof-of-concept, a minimal FaaS, essential in features but completely working. At the heart, there is workerd, the V8-based JavaScript runtime that powers Cloudflare Workers.
And to not make this just a theoretical exercise, we’ll run this in the real world. We’re going to host everything on Fly, which provides infrastructure to rent and manage virtual machines.
We will create our own FaaS on top the Fly PaaS on top the Fly IaaS.
Architecture
Trimmed down to the bare minimum, the architecture of a FaaS can be conflated in two components:
Publisher
The system responsible to receive, manage and store functions definition and their code. Think about it as the admin side.
Worker
The system that accepts user requests and runs the functions’ code. This is the operative side.
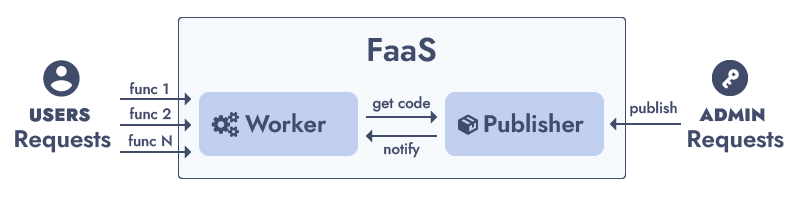
The Worker is the core element of the architecture. It executes the functions. It handles the incoming requests and should — transparently — scale up as traffic increases and scale down when it wanes off.
The architecture proposed with this article uses workerd as the runtime to execute the functions. The workerd project is the same technology that powers Cloudflare Workers. It offers nice features like per-function isolated execution, fast performances, lightweight resource usage, builtin Web API and many others.
Because we’re relying on workerd to run the functions, each function must adhere to the following requirements:
- must be a valid JavaScript ESModule
- must be a single file with all code bundled
- must export as default an object with the fetch entrypoint
- the builtin APIs are listed in the Cloudflare Worker docs
The last step of this guide will focus on the deployment.
We’ll host the FaaS on Fly. A Fly App is an abstraction over several virtual machines. On top of many other things, a Fly App manages load balancing and auto scaling. So, we can run multiple instances of the Worker with no effort. Fly supports container-based deploys, so we will just build container images with docker and push them to the Fly registry.
Although this guide assumes Fly as the target cloud provider, you can reuse the same deploy flow with any other provider that supports containers.
Feel free to host your own FaaS everywhere.
Step 1: Setup the Publisher
The publisher has one job: receive the functions code and store them somewhere.
For each function we need a worker definition, composed by some metadata such as the worker name, and the worker code itself.
type WorkerDefinition = {
  name: string                  // the function name
  module: string                // the function code bundled together as single string
  flags?: string                // optional workerd flags
  compatibilityDate?: string    // optional workerd setting
}
For the Publisher, we’ll create a simple NodeJS API server. We’ll use httpc to build the API, which allows to write just javascript functions and automatically expose them as API.
The Publisher API will define a /publish call, which will accept the worker definition.
export async function publish(definition: WorkerDefinition) {

}
Experiments require a solid and reliable approach. Let’s save the function definition to disk. We’ll use a Fly Volume. Like the docker counterpart, a Fly Volume is a storage which persists across reboots and updates. The environment variable DATA_PATH will indicate where the volume is mounted.
The /publish call will simply write the definition to a json file.
import fs from "fs/promises";
import path from "path";
import { httpCall, useInjected, useLogger } from "@httpc/kit";
import { WorkerDefinition } from "./models";


export const publish = httpCall(
    async (definition: WorkerDefinition) => {
        const dest = useInjected("ENV:DATA_PATH");
        await fs.writeFile(path.join(dest, definition.name + ".json"), JSON.stringify(definition), "utf-8");

        useLogger().info("Published worker %s", definition.name);

        return { success: true };
    }
);
The publish call will create a json file for each function. To update a function, publishing it again will do the trick, as the relative file will be overwritten.
Always validate cross boundary data
A wise man’s saying
We’re not fooling around, let’s use zod to validate the definition.
import { z } from "zod";

export const WorkerDefinitionSchema = z.object({
    name: z.string().min(4).max(20).regex(/^[a-zA-Z0-9-_]+$/),
    module: z.string().min(20), // arbitrary min length
    flags: z.array(z.string().min(2).max(30)).optional(),
    compatibilityDate: z.string().regex(/^\d{4}-\d{2}-\d{2}$/).optional(),
});

export type WorkerDefinition = z.infer<typeof WorkerDefinitionSchema>;
Now we can use the schema to validate the input.
import fs from "fs/promises";
import path from "path";
import { httpCall, useInjected, useLogger, Validate } from "@httpc/kit";
import { WorkerDefinition, WorkerDefinitionSchema } from "./models";


export const publish = httpCall(
    Validate(WorkerDefinitionSchema),
    async (definition: WorkerDefinition) => {
      // same code
    }
);
With the validation in place, everything is safe and sound. Except minor details. Like the validation of the code itself. For this proof of concept, we trust ourself to not blow things up.
And, as the last step, let’s create the Publisher entrypoint to bootstrap the API server.
import { Application } from "@httpc/kit";
import "@httpc/kit/validation-zod";
import { publish } from "./calls";

const app = new Application({
    port: Number(process.env.PORT) || 3000,
    calls: { publish },
});

app.registerEnv();
app.initialize().then(() => {
    app.start();
});
Step 2: Setup the Worker
The Worker executes the functions. It accepts requests, calls the relative function and responds back the result.
The Worker will run workerd as runtime to execute javascript. It executes each function request in isolation, thanks to lightweight virtual scopes. The workerd project is the underlying technology that powers Cloudflare Workers.
A compiled binary of workerd is distributed thought npm. So a simple package install will grant us javascript-execution super powers.
> npm install workerd
# or
> pnpm add workerd
# or
> yarn add workerd
We’ll use a Fly App to host the Worker. A Fly App is an abstraction over multiple virtual machines, called Fly Machine, which manages auto-scaling and load-balancing. Thus, the Fly App will run multiple instances of the Worker, each one in a Fly Machine. This is a fast and effective solution to handle traffic in a flexible way. The auto-scaler will stop machines when the traffic is low and will start (up to an allocated limit) new ones when the traffic increases.
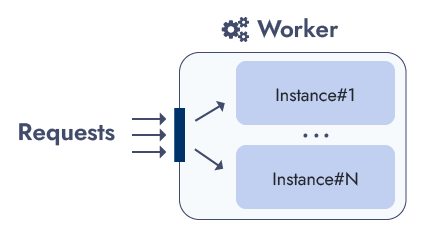
Each Worker instance will run all functions. Thus, any instance can accept requests for any function. This setup drastically simplifies the architecture, as all instances are just clones with no overhead or extra component to manage.
In order to distinguish which function to execute, a routing mechanism is required to dispatch requests to the right function. Based on the request path, the first segment of the pathname will indicate the function name to call:
GET /hellowill call a function named hello
POST /create-postwill call a function named create-post
GET /hello/worldwill call a function named hello, the same as the first point
Of course, the target function will receive the full request with the complete path, verb and everything the http request brings.
The routing is performed by the router, a function running inside the worker in the same manner of any other function. The router is the only exposed function, while all user-defined functions are unreachable from outside.
The router accepts a requests and forwards it to the relative function, inside the same Worker instance.
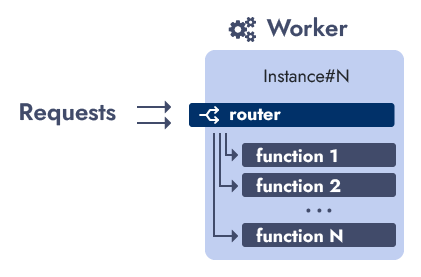
As all Worker instances are clones, the same router, like any other function, is included in each instance.
Workerd configuration
The workerd runtime uses a Cap’n Proto file to define its configuration, that is, which services to run, how they are linked and which resources to use.
At the moment of writing, the workerd project is in beta. The documentation is pretty much inexistent. There’re several examples to showcase basic scenarios, you can read as reference for some features. Therefore, quite a bit of experimentation is needed to produce the desired setup.
In workerd terms, each function we want to execute is a worker. So, the first step is to tell the runtime which workers to run. The config.capnp will list all the function in the service section:
using Workerd = import "/workerd/workerd.capnp";

const config :Workerd.Config = (
  services = [
    (name = "func_1", worker = .func_1),
    (name = "func_2", worker = .func_2),
    ...
    (name = "func_N", worker = .func_N),
  ],
);
And, after that, a worker configuration for each one:
# ... previous code

const func_1 :Workerd.Worker = (
  modules = [(name = "func_1", esModule = embed "func_1.js")],
  compatibilityDate = "2023-02-28",
  compatibilityFlags = []
);

# ... all the other functions
The config.capnp file instructs the runtime which functions to run. And, for each one, the embed directive loads its code from a js file located in the same directory.
So, in order to run the Worker, we just need to produce the config.capnp file, place each functions’ code near it and run the workerd process.
> ./workerd serve config.capnpWith all functions’ declarations and their code, the Worker can load and run them. But which function to execute when a request arrives? At the moment, it lacks the ability to pick the right function to execute according to the incoming request.
And to fill that void, we need the last piece of the puzzle: the router.
The router
The router is the entry point of the worker. It accepts a request and, based on the path, forwards the request to the right function.
Like a user-defined function, the router is just a javascript module. It has the same fetch entrypoint. And, it runs in the same way of any other function. There is just one key difference: the router can see and talk to the user-defined functions.
Via configuration, the router defines one binding for each user-defined function. The binding is an http channel, where the router can send the incoming request and receive the response. In this way, the router acts like a programmable proxy: it forwards the request to the right destination, waits for the answer and passes it back to the caller.
For reference, here’s the router code. The env parameter carries all function bindings as properties.
export default {
    fetch(request, env) {
        const config = env._config;

        // extract the function path --> /$function-name/...splat
        // function name is case insensitive
        const [, route] = new URL(request.url).pathname.toLowerCase().split("/");

        // function not specified or not found
        if (!route || !config.routes.includes(route)) {
            return new Response(null, { status: 404 });
        }

        // worker not loaded
        // something wrong internally
        const worker = env[route];
        if (!worker || typeof worker.fetch !== "function") {
            return new Response(null, { status: 500 });
        }

        // forward the request to the function
        return worker.fetch(request);
    }
}
The flow is quite simple. The router will
- first, extract the function name
- then, check if the function is defined
- finally, forward the request to the function via its binding
As the router is a function itself, we have to list it in the configuration services. In addition, because the router is public face of the Worker, we have to assign a socket on which it can listen for outside requests.
The update config.capnp will be:
using Workerd = import "/workerd/workerd.capnp";

const config :Workerd.Config = (
  services = [
    (name= "func1", worker = .func_1)
    # ...
    # ... all other functions
    # ...

    (name = "router", worker = .router),
  ],

  sockets = [(name = "http", address = "*:8080", http = (), service = "router")],
);
And at the end, the router definition with a config file, a _meta.json with some behavior settings like timeouts and and similar, and all the bindings to the other functions:
const router :Workerd.Worker = (
  compatibilityDate = "2023-02-28",
  modules = [(name = "router.js", esModule = embed "_router.js")],
  bindings = [
    (name = "_config", json = embed "_meta.json"),
    #... all worker reference here ...
  ],
);
Step 3: Prepare the Configuration
The workerd runtime needs the Cap’n Proto config file, the javascript code for each function and the configuration used within the router.
Since all definitions are available to the Publisher, there’s no better place to produce such configuration. For this purpose, let’s create a getConfig call in the Publisher API. This new API will return a zip package containing all data, in a ready-to-go manner, where no further processing is needed.
For reference, here’s the getConfig code:
import fs from "fs/promises";
import path from "path";
import { httpCall, useInjected } from "@httpc/kit";
import { strToU8, zipSync } from "fflate";


export const getConfig = httpCall(
    async () => {
        const dataPath = useInjected("ENV:DATA_PATH");

        const definitions = await readAllDefinitions(dataPath);
        const capnp = composeCapNProto(definitions);
        const routerConfig = composeRouterConfig(definitions);

        // zip all files together
        return zipSync({
            ...Object.fromEntries(definitions),
            "_meta.json": strToU8(JSON.stringify(routerConfig)),
            "config.capnp": strToU8(capnp),
        });
    }
);
The produced zip package contains all the files required to run a Worker instance. At startup, each instance will downloads the configuration, extract it and then run the workerd process.
Step 4: Prepare the Worker
With all the configuration job done by the Publisher, the entry point of the Worker became very easy to implement. A Worker instance have just to:
- download the config zip from the Publisher
- extract it
- launch the workerd process
A simple script will achieve that:
curl -o config.zip $PUBLISHER_ENDPOINT/getConfig
unzip config.zip -d ./config

./workerd serve ./config/config.capnp
Step 5: Dry run
Before putting the whole thing in production, at least, we should do a quick test. Although, the practice of yoloing changes to production is gaining traction, for a full project release, it’s a bit too much for our conscience to take. In the future, with better tooling, we will be confident to jump push everything from the first commit.
So, due to the actual limitations, we’re forced to run a local test. We’ll publish 2 functions and check their responses.
Publishing the first function
First, we launch the Publisher. In the publisher directory:
> export DATA_PATH=/var/tmp
> npx ts-node index.ts

info [Application] started
info [Application] listening on 3000
The Publisher is ready to receive and store function definitions.
The first test function will just return a Hello world json message.
export default {
  fetch() {
    return new Response(JSON.stringify({ message: "Hello world from Func1" }));
  }
}Now, we can actually publish the function. A simple http POST request to the /publish endpoint is enough. The whole function code must be sent as single string within the json definition. In the Bonus content we’ll explore a little CLI util to make publishing easier. For now, we manually forge the request.
You can use whatever tool you like to send the request:
POST http://localhost:3000/publish
Content-Type: application/json

{
    "name": "test1",
    "module": "export default { fetch(){ return new Response(JSON.stringify({ message: 'Hello world from Func1' })); }}"
}
You should receive the response:
HTTP1/1 200 OK
Content-Type: application/json

{ "success": "true" }
with the Publisher console logging:
info [Application] Published function: test1Running the Worker
The start Worker, we just execute its entrypoint. Inside the worker directory:
> export PUBLISHER_ENDPOINT="http://localhost:3000"
> ./entrypoint.sh
You should see an output similar to:
Archive:  config.zip
  inflating: ./config/test1.js
  inflating: ./config/_meta.json
  inflating: ./config/config.capnp
The Worker downloaded the config.zip archive from the Publisher, unzipped it and finally launched the workerd process.
Testing the first function
As defined in our config.capnp, the Worker listens on port 8080. Let’s call the function:
GET http://localhost:8080/test1You should receive:
HTTP/1.1 200 OK
Content-Type: application/json

{
  "message": "Hello world from Func1"
}
Publishing a second function
With the second test function, we’ll test a more dynamic logic. The function will respond back some request parameters: the method and the full path.
export default {
  fetch(request) {
    return new Response(JSON.stringify({
      method: request.method,
      path: new URL(request.url).pathname,
    }));
  }
}
Let’s publish it (remember to concatenate the whole code into the module field):
POST http://localhost:3000/publish
Content-Type: application/json

{
    "name": "test2",
    "module": "export default { .... }"
}
2nd test
Stop the Worker process and relaunch it. With a simple restart, the Worker will pick up a fresh configuration with the new function. In the Bonus content we’ll explore ways to automate this.
After the Worker is run, you can make requests to the second function:
GET http://localhost:8080/test2The result:
HTTP1/1 200 OK
Content-Type: application/json

{
  "method": "GET",
  "path": "/test2"
}
A second request:
POST http://localhost:8080/test2/sub-pathThe result:
HTTP1/1 200 OK
Content-Type: application/json

{
  "method": "POST",
  "path": "/test2/sub-path"
}
Checking a random path
As the testing need to be thorough, let’s try a random function name:
GET http://localhost:8080/random-funcYou should receive:
HTTP/1.1 404 Not FoundWe didn’t miss anything. The router is well and answered correctly.
Step 6: Deploy
Let’s put our own FaaS in the wild! We’ll host both the Publisher and the Worker on Fly and deploy them via container images. Docker will build the images. After that, we will push the images to the Fly registry.
Publisher
As first step, we need to create an app on Fly. Inside the publisher directory, open a shell and run:
> fly launch --no-deployThe previous command will initialize a new Fly App. When finished, a fly.toml file is created in the directory. Open it and keep the app name on the side.
app = "restless-fire-6276"Before deploying the app, we need to create the volume where all functions definition are saved.
> fly volumes create self_faas_data --size 1After, we can mount the volume to make it available to the filesystem. Just edit the fly.toml and append:
[ENV]
DATA_PATH = "/data"

[[mounts]]
destination = "/data"
source = "self_workerd_data"
All is set now. Let’s build the image via docker.
> docker build -f ./Dockerfile .. -t self-faas-publisherFinally, we can deploy the Publisher.
> fly deploy --image self-faas-publisher --local-onlyWorker
As done for the Publisher, let’s create the worker app first.
> fly launch --no-deployOpen the fly.toml and the define the endpoint for the Publisher, from where the Worker will request the configuration.
[env]
PUBLISHER_ENDPOINT = "http://{PUBLISHER_APP_NAME}.internal:3000"
We can have auto-scaling managed by Fly for us. Set this configuration:
[[services]]
auto_start_machines = true
auto_stop_machines = true
min_machines_running = 2
The previous settings instruct the Fly Proxy to automatically handle traffic by stopping instances when requests are low and start up new ones when requests increases. The decision is made according thresholds set in the same fly.toml.
[services.concurrency]
hard_limit = 250
soft_limit = 200
type = "requests"
When traffic is under threshold, the auto-scaler will begin to stop instances down to the min_machines_running limit set. When traffic is over threshold, the Fly progress will start bring new instances live up to a limit we will configure in the steps. Mind the auto scaling is not immediate. It requires a brief period of time where traffic conditions are the same to trigger the scaling actions.
Now, let’s build the Worker image via docker.
> docker build -f ./Dockerfile .. -t self-faas-workerFinally, we can deploy the image.
> fly deploy --image self-faas-worker --local-onlyAfter the deploy, we can scale the app instances:
> fly scale count 4This will set the upper limit number of instances Fly will run for the Worker.
Live!
What a long journey! If you are still with me here, then you have now a fully working Function as a Service system at your disposal. Please, manage carefully this new power of yours, as like they say, with great powers …
Bonus content
Like all content these days, the plan is to ship optional expansions to keep audience engaged or — how they say it? — to milk something longer.
Here, you can pre-order additional chapters:
Secure the Publisher API
Add authorization guard to make sure only admins can publish functions
Auto restart workers on publish
Automatically notify workers when a new config is available
Publishing cli util
Smooth the publishing with a simple command and no manual request forging
Use your upvote money, and stay up to date following @giuseppelt.