EmailFlare: Send emails from your domain through Cloudflare for free

A complete open-source webapp you can copy and deploy on your Cloudflare account and start sending emails from all your own domains
Introduction
Do you own a custom domain for a product or service? Do you need to send emails from your domain?
EmailFlare is a web app you can use to send emails from your own domain. EmailFlare is not a service or product you need to signup. As open-source MIT-licensed software, you can host your own EmailFlare for your domain and keep everything in control.
On top of that, you don’t need to deal with complex configuration or setup. EmailFlare provides a deploy wizard to automate the process. If you are already a Cloudflare customer, then you’re set. You can use EmailFlare to send emails from your domain for free with a nice web interface accessible to every device.

With EmailFlare, you keep full control. You host your own EmailFlare on your Cloudflare account. For example, you can publish it on:
https://email.yourdomain.com
sub domain configurable
from where you can send emails with just your browser.
Features
- Multiple destination — add multiple emails in the To field separated by a comma. NB: this will not duplicate the email, it will send one mail to multiple recipients.
- Markdown support to enrich text with simple formatting, links …
- Configurable sender list, ex: hello@domain.com, contact@domain.com, …
- Auto deploy to your Cloudflare account
Requirements
EmailFlare sends emails through Cloudflare by using a worker deployed on your account. To deploy your own EmailFlare for your domain, you need:
- a Cloudflare account
- your website DNS is managed by Cloudflare
- workers enabled for your account
Technical details
An extended deep dive on how EmailFlare is built and works is postponed in a future article. For now, a quick overview will work — hopefully — as a hooking trailer for what’s to come.
EmailFlare is fullstack webapp. It includes both the client side — the UI — and server side — the API. Both sides are packaged and bundled together in a single-file worker.
A single worker acts for the two sides. It delivers the static assets — UI, images, fonts, … — to the browser. And, it responds to API calls.
EmailFlare is just an experiment on how you can deploy and serve a full webapp with a single worker, on the edge, or on a FaaS solution. This is a first step in a more advanced scenario I will show in the future.
Step 1: Setup Cloudflare
To deploy your own EmailFlare on Cloudflare, you need to create:
- a worker — it will serve the EmailFlare app
- a route — a public address to access your EmailFlare from a browser
- an API token — if you use the deploy wizard, the api token is used to auto deploy EmailFlare to your account
Create a Worker
In your Cloudflare dashboard, activate Cloudflare Workers if you didn’t already. The free plan is enough, as it has large limits. Then, just create an new empty Worker. You can assign any name, for example your-domain-ef. Keep in mind the name, we will use it later.
Let’s use the default code, the one suggested by the dashboard — it doesn’t matter as it will be replaced by the EmailFlare code — and deploy the worker.
Usually Cloudflare assigns an address in a subdomain of workers.dev.
Assign a subdomain to the Worker
Now that the worker is active, we can add a more friendly address to the worker. With a simple route, you can bind the worker to a subdomain of your domain, like
https://email.yourdomain.com
In the details page of the worker you just created, in the Triggers panel, you can add the address you want in the custom domain section.
Create an API Token
If you want to use the EmailFlare auto deploy, you need to create an API token for your Cloudflare account. The deploy wizard does all the work for you. It will deploy automatically EmailFlare to your account with no manual step needed.
From the profile page of your account, you can navigate to the API Tokens page. Let’s create a new token. Pick the Edit Cloudflare Workers template and create the API token. Give the token a clear description, something like “EmailFlare deploy token”.
After, copy the API token, and put it aside, keep it safe.
Step 2: Setup DNS
To let EmailFlare send emails on behalf of your domain, some DNS configuration is needed.
Navigate to the DNS panel of your domain. We need to add 3 DNS records:
- SPF
- Domain Lockdown
- DKIM
Add the SPF record
The SPF record is a security mechanism which ensures only authorized party can send emails from your domain.
For EmailFlare, we need to add both cloudflare and mailchannels as authorized senders.
| type | name | value |
|---|---|---|
| TXT | @ | v=spf1 include:_spf.mx.cloudflare.net include:relay.mailchannels.net ~all |
If you don’t have a SPF record, just copy and paste it in your DNS panel. If you already have a SPF record — maybe you send mails with an other provider too — just include both the include:xxxxxx directives.
Add the Domain Lockdown record
Domain Lockdown is an additional layer of security required by MailChannels to send your emails. It defines which workers and domain can actually call MailChannels to send email for your domain.
For EmailFlare, we need to add your worker address and your domain.
| type | name | value |
|---|---|---|
| TXT | _mailchannels | v=mc1 cfid=your-worker-domain cfid=your-domain example: v=mc1 cfid=my-account.workers.dev cfid=my-product.com |
Add the DKIM record
A DKIM record defines a cryptographic key used to verify emails sent from your domain. A DKIM record improves deliverability of your emails, as email providers can verify the mail by checking the signature by looking the DKIM key.
Although, this step is not required, is highly recommended as you don’t want your mails end up in the spam folder.
First of all, we need to generate the cryptographic key. Open your terminal, make sure you have OpenSLL, and run:
openssl genrsa 2048 | tee private_key.pem | openssl rsa -outform der | openssl base64 -A > private_key.txtThis will create a private_key.text file, with a private key which uniquely identifies you. With the private key, now we can generate the public key, that is the one used in the DKIM record.
Again, in the terminal please run:
echo -n "v=DKIM1;p=" > dkim_record.txt && openssl rsa -in private_key.pem -pubout -outform der | openssl base64 -A >> dkim_record.txtThis will create a dkim_record.txt with the actual DKIM record. Open it, and copy the content.
Finally, let’s add the record to the DNS.
| type | name | value |
|---|---|---|
| TXT | mailchannels._domainkey | the content of the dkim_record.txtexample: v=DKIM1;p=… |
Step 3: Launch EmailFlare Builder
Now you’re ready to create your own EmailFlare. Head to:
https://emailflare.breakp.dev
EmailFlare homepage
Navigate to the Builder page and fill the configuration for your domain:
- Domain — your origin domain, for example: my-product.com
- Senders — the list of emails you want to use as sender
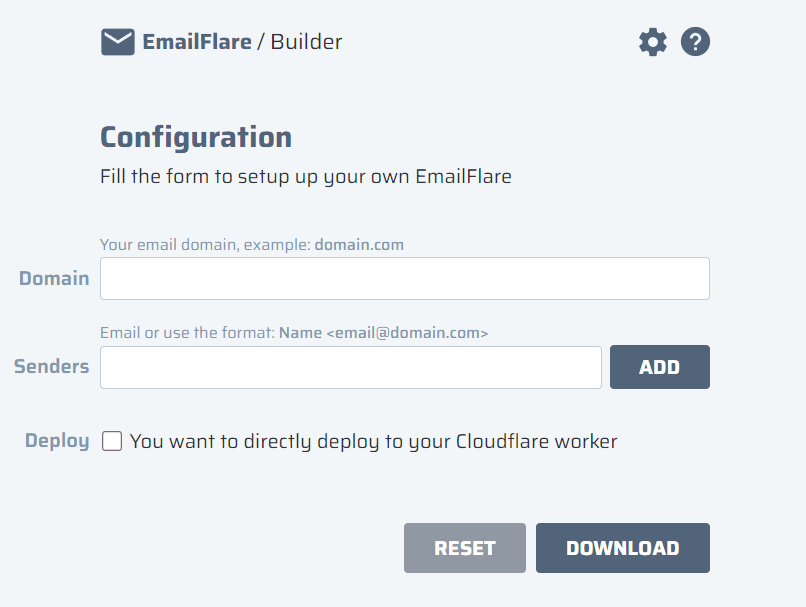
Then you can, either download EmailFlare and manually deploy it, or you can let the Auto Deploy do the work for you.
Manual deploy
The manual deploy involves in 3 steps:
- Download the EmailFlare from the Builder — you will get a single
worker.js. - Drag and drop it on the Cloudflare dashboard in your worker code editor.
- Define 3 environment variables, in the Settings/Variable section of the worker:
name description Encrypt SENDER_DOMAINyour domain, example: my-product.com No SECRET_KEYthe password you want to use to send the emails Yes DKIM_PRIVATE_KEYthe content of the private_key.txtyou generated in the DKIM stepYes
Due to a limitation in the actual Cloudflare dashboard — you can’t set compatibility flags — you need to run a command from the terminal.
Be sure to have npm installed, open a terminal, navigate to the folder where worker.js is located and run:
npx wrangler deploy worker.js --name WORKER_NAME --compatibility-date 2013-08-01 --compatibility-flags nodejs_compatReplace WORKER_NAME with the actual name of the worker, just the name, not the full address.
Auto deploy
Tick the Deploy checkbox to reveal the deploy form.
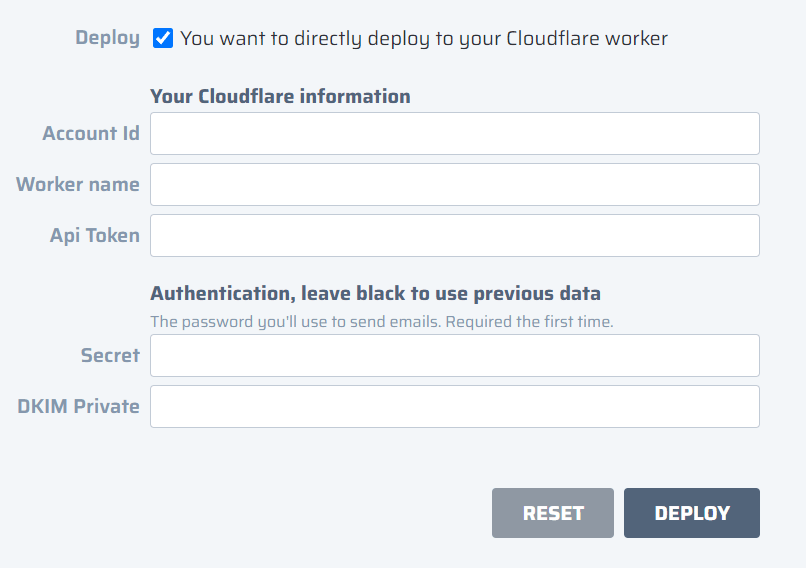
Fill the form with your information.
In the authentication:
- Secret: the password you want to use to send the emails
- DKIM private: the content of the
private_key.txtyou generated in the DKIM step
You need to fill the Authentication section only the first time. Or, if you want change your password, you can type a new one in the Secret field.
Then, hit Deploy. Enjoy!
Step 4: Run
Your EmailFlare is ready 🚀. After you completed the deployment — manually or via wizard — you can start sending email from your domain with EmailFlare.
Navigate to the address you bound to the worker. The EmailFlare UI will show a composer where you can type your emails.
In the Auth field, you need to put the password you configured. You can let the browser store it for you, so you don’t need to retype it every time.
Troubleshooting
Here’s are a list of issues you can face while creating or using EmailFlare.
Cloudflare DKIM Not Working
If you see the error:
DKIM public key and private key mismatch: fail to parse public key in PKIX format
Maybe:
You wrongly copy-pasted the DKIM record on your DNS
💡 Try to regenerate the keys with terminal following the instruction
You’re on Windows and you ran the commands via terminal or powershell
💡 You need to use a bash shell. Use can use the git-bash shell, or wsl.
To verify the integrity of your DKIM key, try to use a DKIM key checker, available here and verify your keys. Use mailchannels as DKIM selector.
Contributing
EmailFlare is open source and developed on GitHub. Every contribution is welcome, from error reporting to feature request.
Or, if you just want to discuss about it, feel free to head to the repository and write your thoughts.